


Step 1: Create the Design
1: In order to be able to start our Design, we are going to access our Design Space application and in there we are going to click on the + New Project Green button located on the top Right corner of our screen.

2: After we clicked in there, we are going to be able to access our Blank Canvas, in where we are going to start creating our Design:

3: We are going to use the Shapes functionality to add a square to our canvas.

4: We are going to resize our square with the following size: W: 10” and H: 5.5”

💡Tip: If you want the W and H not to be tight together, click on the lock that is showing, so you can add the different dimensions separately.

5: We are going to change the color to the desired one for our card base, this is just to help us to see how the design is looking, but the final color is going to be the cardstock that is going to be cut.

6: Using the shapes functionalities, we are going to add 2 scoring lines to our canvas:

7: We are going to resize the scoring lines to the same High as the card, in our case 5.5”.

We are going to dive our card in 3 sections, 2 small ones on each side, and one bigger in the middle, from each side, we are going to place the score lines 2.5” to the center of the card:

8: We are going to upload our mermaid scale file. We are going to use the upload button in the left vertical menu and we are going to follow the process in there to add the design to our canvas.

9: We are going to add another square with the following measurements: W: 2.25” and H: 5.25”, and we are going to place it over the mermaid scales:

Once we placed it over the scales, using the Slice functionality we are going to slice them:

From the slice result, we are going to use the following pattern, and you can delete the rest.

💡Tip: You can use the other patterns if you prefer, this is based on what you like better.
10: You are going to duplicate the scale pattern:


11: We are going to place each scale on each side of the card and we are going to slice them:
Before the slice:

After the slice:

12: Now, we can attach the score lines to our base card.

13: We are going to proceed and upload our mermaid design, the same way that we did with our mermaid scales.

💡Tip: You can keep all the components of the mermaid or like in our case, we are going to delete and change some of the elements.
OPTIONAL: if you want to change some elements, continue with the following steps, if not proceed to STEP 19:
14: First, we are going to ungroup all the elements, by selecting the mermaid and right click over it and clicking on Ungroup:

After click on the ungroup:

15: In our case we are going to delete the face, the detail over the hair. Also, we are going to delete the chicks and replace the top of the suit.
In order to replace the top, we are going to place a square over the design and we are going to slice it:
Before the slice:

After the slice:

At this point we have the following:

💡Tip: You can change the color of the hair or any of the other elements using the same process as changing colors for shapes.
16: Using the shape functionality, we are going to add a star and resize it to add it to the hair.

17: For the top, we are going to use images functionalities and we are going to search for:

Since the shell has 3 lines inside, that means that those lines are going to be cut, so we need to use a shape over them and weld them in order to avoid the cut:

After the weld:

We are going to resize it and place it over the mermaid:
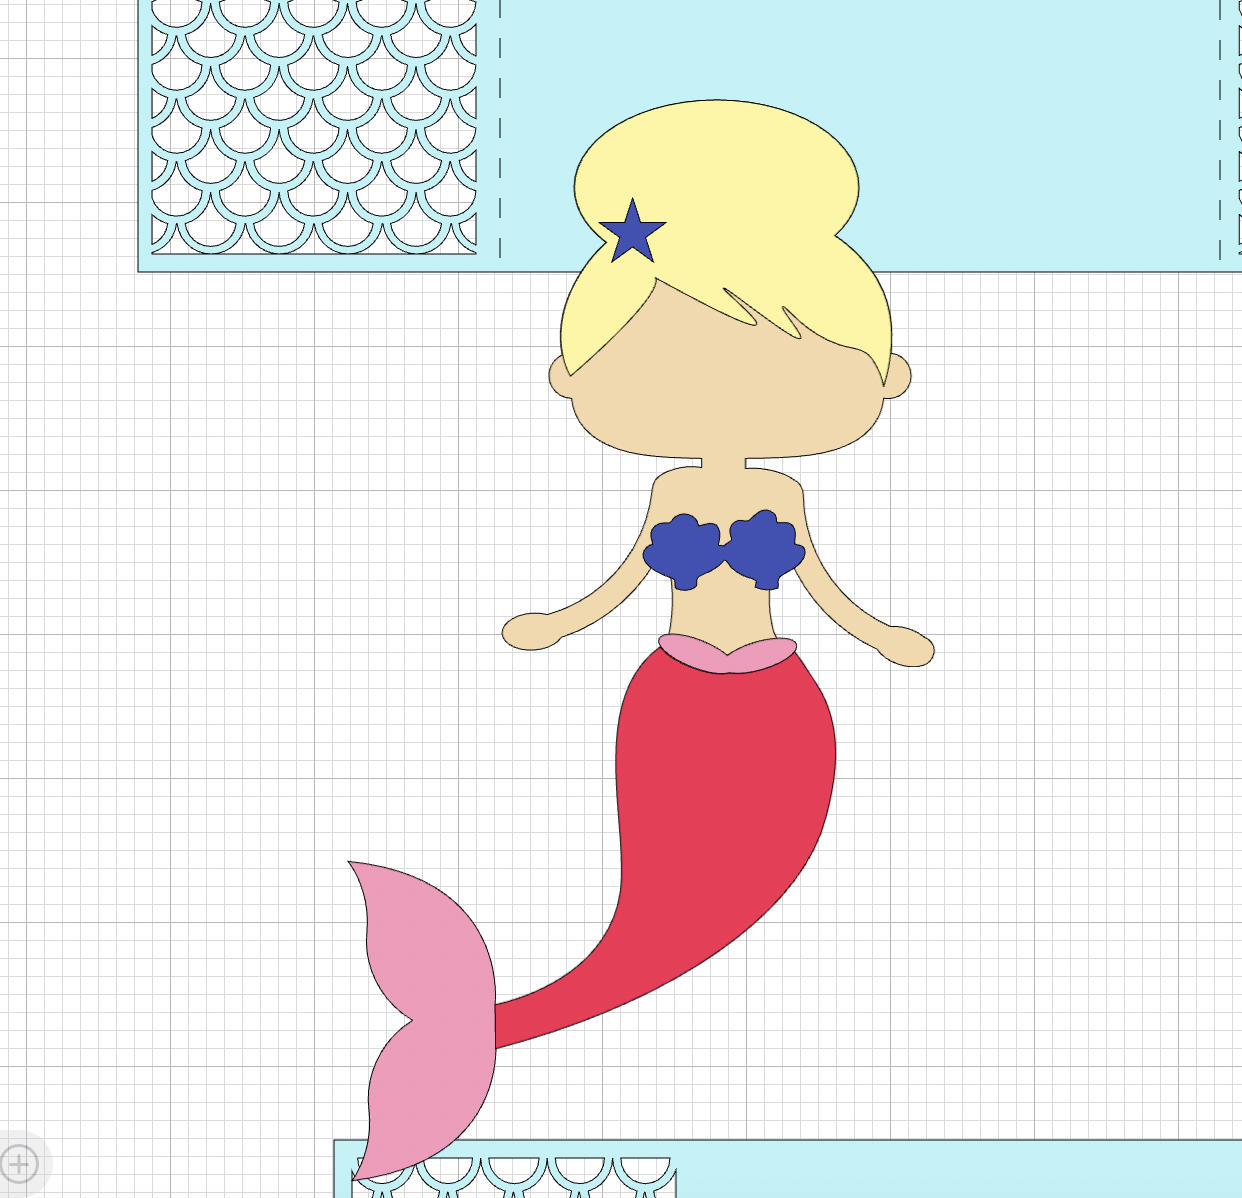
18: Now we are going to group all the elements related to the mermaid:

19: Once that you group the elements, we are going to create an offset for the mermaid:

After applying the offset:

20: Now, we are going to resize the mermaid and the offset to fit our card. The mermaid is going to be on one of the sides in where we added the mermaid scales:

21: We are going to align the mermaid, the offset and the card:

22: Now, we are going to move our colorful mermaid to a side, and we are going to select the offset and the card and we are going to weld them together:

After applying the weld functionality:

23: Now we are going to do the insert of our card. We are going to add a square with the following dimensions W: 4.5” and H: 5.1” and we are going to change the color to white or any light color of your preference.

24: Using the text functionality we are going to write our phrase/sentiment. In our case we are going to use: Happy Birthday little Mermaid.

25: We are going to change the font, by selecting the text and clicking on the Font field, and in there inside the cricut fonts, we are going to search for Flower:

After you changed the font, you should have something like:

💡Tip: You can use any other font that you like!.
26: We are going to draw our sentiment on the card, so we are going to change the operation from Cut to Draw:

27: We are going to place the text over our insert square and we are going to attach them together, so our machine knows where it needs to draw/write.

💡Tip: Do not forget to resize your sentiment and align them in the place that you want it to be written.
28: Our design is READY and we can start cutting!
Step 2: Cut the Design
1: After you are happy with the design, we are ready to save our design, Click on Save button on the Right Top side of the screen and provide a name to your design and click on Save button.

2: We are going to click on the Make button to start configuring our materials!

3: You are going to be able to see one mat per color of your design, remember that the colors there are for reference only, the real color is going to be the one related with the cardstock that you are using.

4: We are going to click on the Continue button, and in the next screen we are going to choose the material that we are going to cut, in our case we are using a light cardstock and in our case with our glitter cardstock we are also going to use the same settings.

💡Tip: If your glitter cardstock is heavier that your normal cardstock do not forget to change the settings before cutting them. We are using the glitter for the mermaid’s top, the star on her hair and the mermaid’s tale.
💡Tip 2: Also, do not forget to add your pen and your scoring pen when you are going to cut those elements, if this applies to your design.
5: After you cut all your elements, you should have the following:

6: You are going to remove all the elements very gently from the mat:


Step 3: Assemble your Card
1: After all your elements were removed from the mat, we are going to start assembling our card, we are going to start filling the inside of the letters from our inside and also, we are going to use ink to add more finish details to it.

💡Tip: You can leave your text without filling the inside or avoid the ink, you can also add stickers or other embellishments if you preferred.
2: We are going to fold our base card by following the scored lines:

3: We are going to start adding our mermaid components by using glue, first we are going to start with the body, then the hair and after that the star:

We are going to proceed with the top and the tale:

4: We are going to glue our insert inside the base card and we also are going to apply some ink on all the borders of our base card, inside and outside:


5: Our card is READY, you did an amazing job!
